
| 일 | 월 | 화 | 수 | 목 | 금 | 토 |
|---|---|---|---|---|---|---|
| 1 | 2 | 3 | ||||
| 4 | 5 | 6 | 7 | 8 | 9 | 10 |
| 11 | 12 | 13 | 14 | 15 | 16 | 17 |
| 18 | 19 | 20 | 21 | 22 | 23 | 24 |
| 25 | 26 | 27 | 28 | 29 | 30 | 31 |
- 추론 통계
- PostgreSQL
- divide and conquer
- Solid
- Algorithm
- 오일러 경로
- 확률분포함수
- 깊이 우선 탐색
- 객체 지향 설계
- 알고리즘
- 표본 추출
- 분할정복
- 재설치
- dfs
- 확률변수
- 확률분포
- spring boot
- Probability Distribution Function
- 인터페이스
- BFS
- 이진탐색
- 베이지안
- 기술 통계
- 너비 우선 탐색
- 다형성
- 스프링
- 확률
- 이분탐색
- Random variable
- dag
- Today
- Total
말하는 감자
[스프링부트 스터디] 스프링 DB 접근 기술 본문
그동안 메모리에 데이터를 저장했었기 때문에 서버를 닫으면 데이터도 함께 날아갔었다. 실무에서는 데이터베이스를 따로 두기 때문에, 다양한 데이터베이스를 가지고 실습을 한다.
1. H2 데이터베이스 엔진
H2는 용량이 적은 데이터베이스로 교육용으로 적합하다.
https://www.h2database.com/html/main.html
H2 Database Engine
H2 Database Engine Welcome to H2, the Java SQL database. The main features of H2 are: Very fast, open source, JDBC API Embedded and server modes; in-memory databases Browser based Console application Small footprint: around 2 MB jar file size Suppor
www.h2database.com
연결을 누르면 컴퓨터 사용자 home에 test.mv.db라는 파일이 있는 것을 확인해야 한다.
이후로는 jdbc:h2:tcp://localhost/~/test 로 연결하는 것이 좋다. 문제가 생기는 경우에는 서버를 닫고 test.mv.db 파일을 삭제하고 처음부터 다시 시작한다.
drop table if exists member CASCADE;
create table member
(
id bigint generated by default as identity,
name varchar(255),
primary key (id)
);
이 데이터베이스에 기존처럼 Member 도메인을 동일하게 설정해준다. id는 시스템상에서 자동으로 매겨주게 하기 위해서 'generated by default as identity' 구문을 사용한다.
메모리에 의존해서 데이터를 쌓던 기존 프로젝트에 h2 데이터베이스를 연결하는 작업을 한다.
build.gradle에 추가 → 업데이트
implementation 'org.springframework.boot:spring-boot-starter-jdbc'
runtimeOnly 'com.h2database:h2'
resources/application.properties에 추가
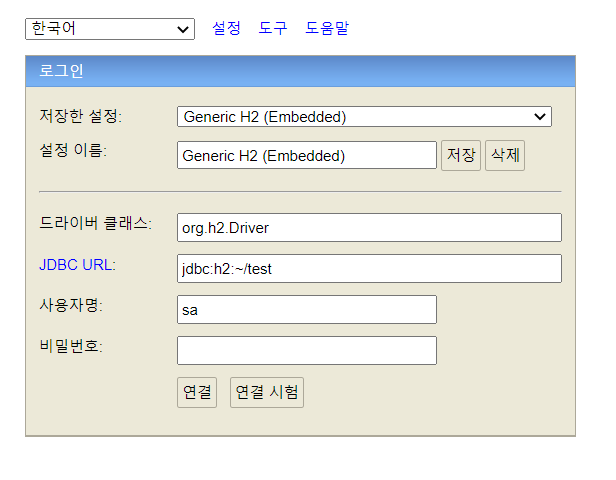
spring.datasource.url=jdbc:h2:tcp://localhost/~/test
spring.datasource.driver-class-name=org.h2.Driver
spring.datasource.username=sa
repository/JdbcMemoryRepository
- 이제 Jdbc 리포지토리 클래스를 작성해 주어야 한다.
- 과거에는 일일이 DB에 연결하고, 실행하는 것을 넣어주었다고 한다.
- DataSource는 데이터베이스 커넥션을 획득할 때 사용하는 객체다.
- DB를 썼으면 resource들은 모두 반납해주어야 한다.
public class JdbcMemberRepository implements MemberRepository {
    private final DataSource dataSource;

    public JdbcMemberRepository(DataSource dataSource) {
        this.dataSource = dataSource;
    }

    @Override
    public Member save(Member member) {
        String sql = "insert into member(name) values(?)";
        Connection conn = null;
        PreparedStatement pstmt = null;
        ResultSet rs = null; //받을 결과
        try {
            conn = getConnection(); //DB 연결

            pstmt = conn.prepareStatement(sql,Statement.RETURN_GENERATED_KEYS);
            pstmt.setString(1, member.getName());

            pstmt.executeUpdate(); //DB에 실제 쿼리 적용

            rs = pstmt.getGeneratedKeys(); // 시스템에서 자동으로 매겼던 id

            if (rs.next()) {
                member.setId(rs.getLong(1));
            } else {
                throw new SQLException("id 조회 실패");
            }
            return member;
        } catch (Exception e) {
            throw new IllegalStateException(e);
        } finally {
            close(conn, pstmt, rs);
        }
    }

    ```
    다른 메서드 오바라이딩
    ```
    private Connection getConnection() {
        return DataSourceUtils.getConnection(dataSource);
    }
    private void close(Connection conn, PreparedStatement pstmt, ResultSet rs)
    {
        try {
            if (rs != null) {
                rs.close();
            }
        } catch (SQLException e) {
            e.printStackTrace();
        }
        try {
            if (pstmt != null) {
                pstmt.close();
            }
        } catch (SQLException e) {
            e.printStackTrace();
        }
        try {
            if (conn != null) {
                close(conn);
            }
        } catch (SQLException e) {
            e.printStackTrace();
        }
    }
    private void close(Connection conn) throws SQLException {
        DataSourceUtils.releaseConnection(conn, dataSource);
    }
 }
SpringConfig
- 이제 설정을 바꿔주면 된다. 간편하게 MemoryMemberRepository()를 돌려주던 것에서 JdbcMemberRepository를 돌려주는 것으로 바꿔주기만 하면 된다.
- 생성 시 건네주어야 하는 데이터베이스 커넥션만 등록되어 있는 하나를 찾아 연결시켜주는 어노테이션 Autowired로 표시한다.
- 필드 주입으로 구현해도 되고, 지금과 같이 constructor만 노출시켜 구현해도 된다.
@Configuration
public class SpringConfig {

    private DataSource dataSource;

    @Autowired
    public SpringConfig(DataSource dataSource) {
        this.dataSource = dataSource;
    }

    @Bean
    public MemberService memberService() {
        return new MemberService(memberRepository());
    }
    @Bean
    public MemberRepository memberRepository() {

        //return new MemoryMemberRepository();
        return new JdbcMemberRepository(dataSource);
    }
}
이렇게 하면, 서버를 껐다 켜도 데이터는 그대로 남아있다.
'Backend' 카테고리의 다른 글
| [스프링부트 스터디] 서블릿 (2) - HttpServletRequest (0) | 2021.07.25 |
|---|---|
| [스프링부트 스터디] 서블릿 (1) (0) | 2021.07.22 |
| [스프링부트 스터디] 회원 관리하는 웹 MVC 개발 (0) | 2021.07.11 |
| [스프링부트 스터디] 스프링 빈과 의존관계 (0) | 2021.07.11 |
| [스프링부트 스터디] 회원 관리하는 백앤드 개발 (0) | 2021.07.08 |